Integrating Lifx Bulb with Home Assistant across IOT Vlan using pfSense and Unifi
- Glossary
- Overview
- Network Topology
- Setting Up Networking
- Setting Up LIFX Bulbs (And LIFX Specific Networking)
- Adding Lifx Integration with Home Assistant
- Summary
- Disclaimer
Glossary
-
Internet Of Things (IOT): describes a network of physical objects, so known as, “things” — that are embedded with sensors, software, and other technologies used for the connecting and exchanging data with other devices and systems over the Internet. For example smart thermostats, home security cameras, smart speakers, smart bulbs etc.
-
Lifx Bulb: Wifi enabled light bulbs from the company Lifx.
-
Home Assistant: is a free and open-source software for home automation that is designed to be the central control system for smart home devices with focus on local control and privacy.
-
VLAN (Virtual Local Area Network): is a partitioned subnetwork which is used to group together of similar devices on their own isolated networked.
-
Unifi: Networking hardware company known for their switches and Access Points.
-
pfSense: is an open source firewall/router based on FreeBSD.
Overview
As the joke goes, the S in IOT stands for security. Over the years using IOT devices as attack vectors onto personal networks has been a proven concern. To combat rouge IOT devices it has become standard practice to give them their own VLAN. However moving IOT devices to a separate network can very quickly impact usability from a trusted network such as problems with discovery, and control.
In my search for the proper way to setup an isolated network for IOT system and still maintain control over the Lifx I found no write ups that covered my whole application, because of this the following will be part project post and part instructional for setting it up yourself.
Network Topology
Before getting started I wanted to layout what the network will look like to make it easier to understand the steps that are taking place. In the image below you can see the Home Assistant Server and lifx bulb spanning the two networks (trusted and IOT Network). For the instructions to work the Home Assistant Server does not need to be running in a hypervisor, I decide to do it this way since I have a number of other VMs running already.
I am running pfSense as my router and firewall then a Unifi switch and access point. I have not tested this with other switches and access points but a majority of the network configuration takes place on the router so as long as you have a managed switch and can broadcast multiple ssids with different VLANS most of the setup should be the same.
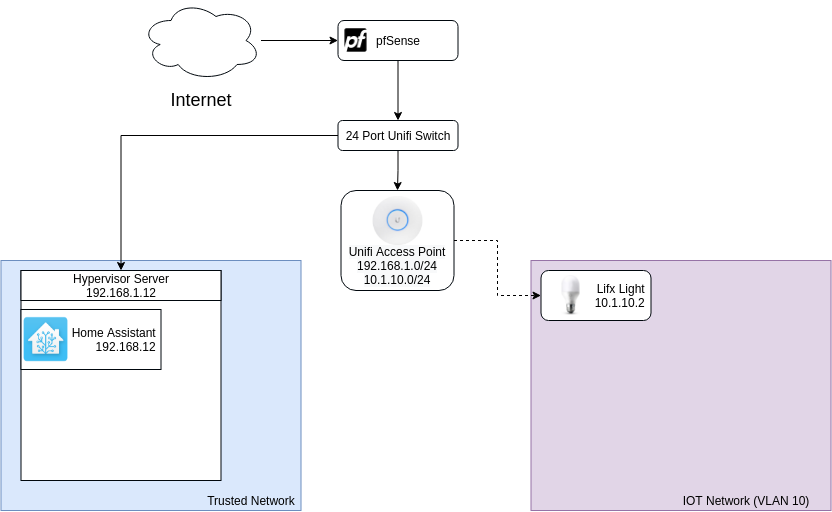
Final Network Topology
Setting Up Networking
I will be making the assumption that there is already a Home Assistant server running on the network, for instructions for setting one up please look here.
Setting Up IOT Vlan On pfSense and Unifi
To begin we need to create the IOT Vlan our IOT devices will live on.
-
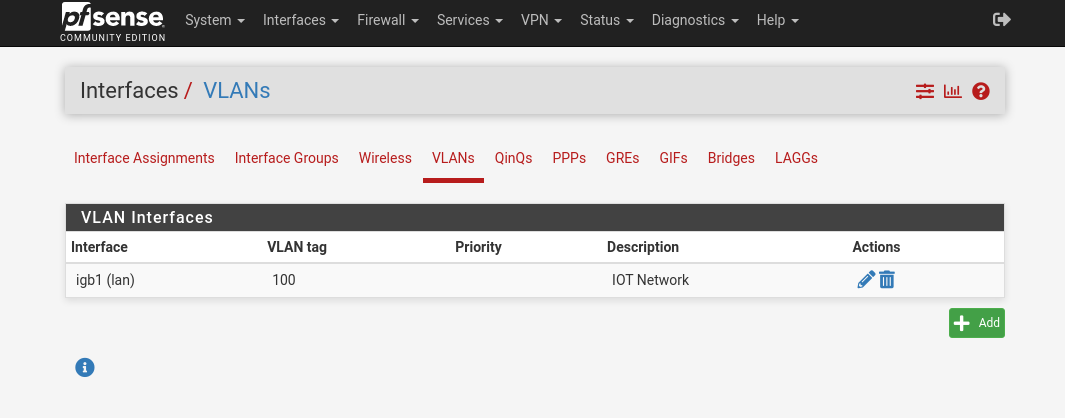
To create the vlan go to Interfaces->Assignments and select the VLANs tab. Add a vlan with the parent interface of lan and your choice of vlan value.

-
After saving the vlan it should look like this:
-
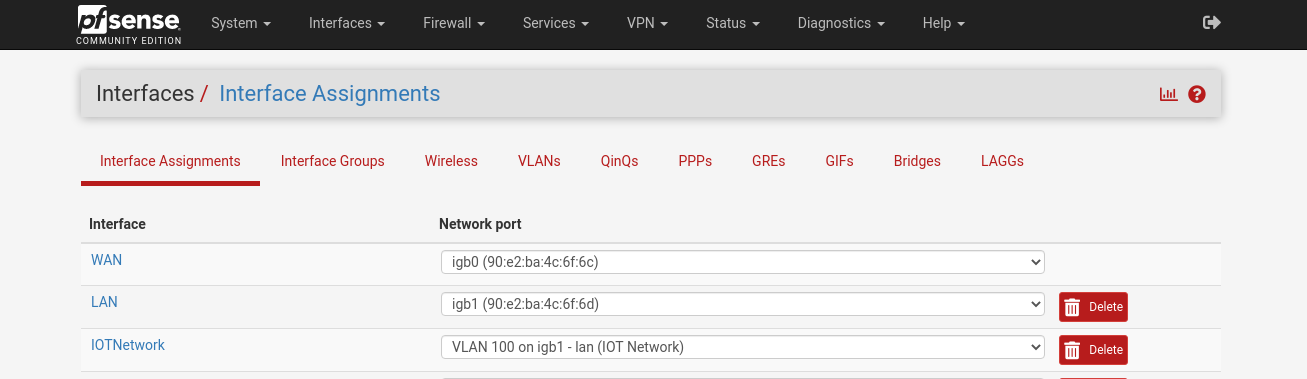
Next we will create the interface.
- Go to the Interfaces -> Assignments -> Interface Assignment (this should be the default On the Available network ports choose your VLAN from the drop down and click Add.
-
Setup the Interface
-
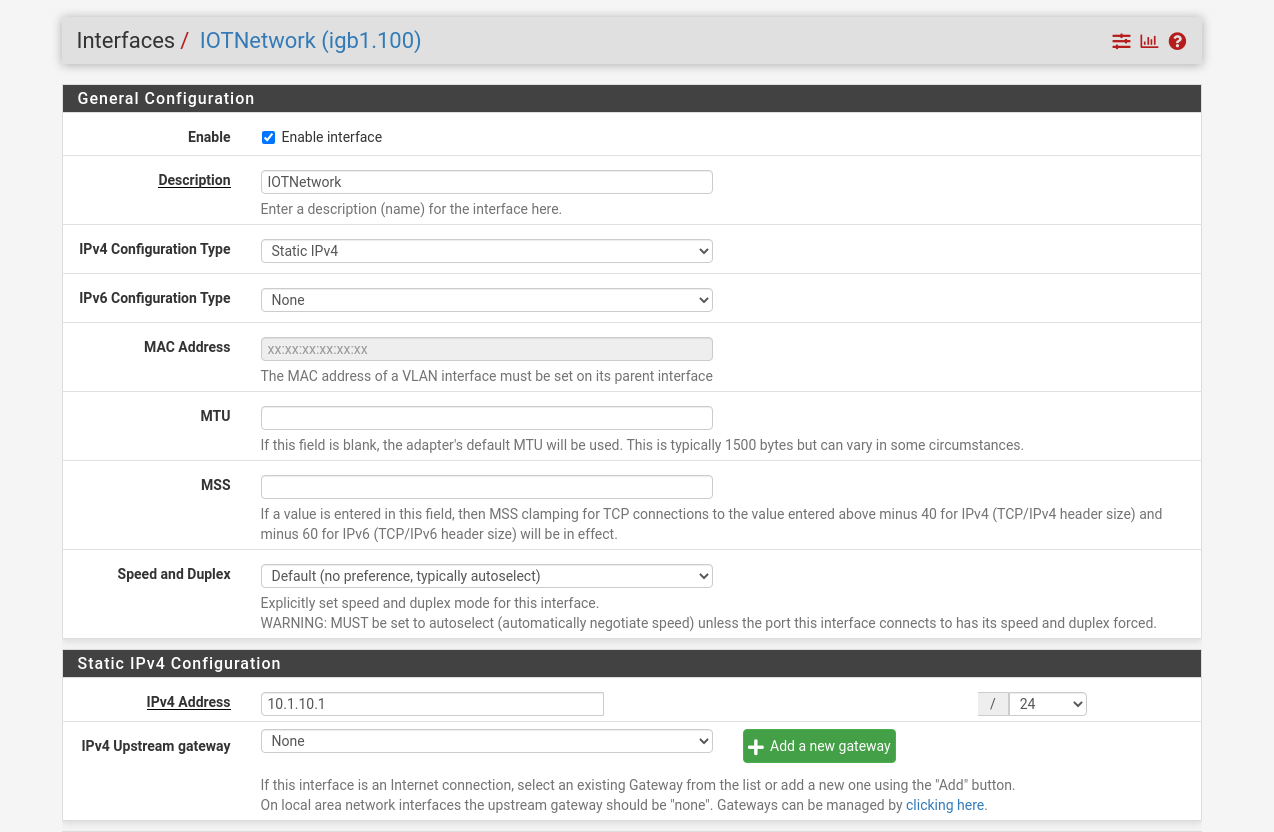
Click the Interface name of the newly created Interface and enable the interface, add an description and set IPv4 Configuration Type to Static IPv4.
-
Under IPv4 address type in the ip block you want along with the CIDR (I went for 10.1.10.1\24, it can be helpful to match vlan and ip address ie. for vlan 100 I chose 10.1.10.1 where as with vlan 200 I would have selected 10.1.20.1). Click Save.
-
-
Create a private network alias to simplify firewall rules.
- Go to Firewall -> Aliases under the IP tab click add. Select Network(s) from the Type drop down, name your private networks alias (I went with PrivateNetworks) and add your private network (mine is the default 192.168.1.1\24). Click save.
-
Setting up the firewall we need to add two rules.
-
Go to Firewall -> Rules and select your new interface, for me this is IOTNETWORK.
-
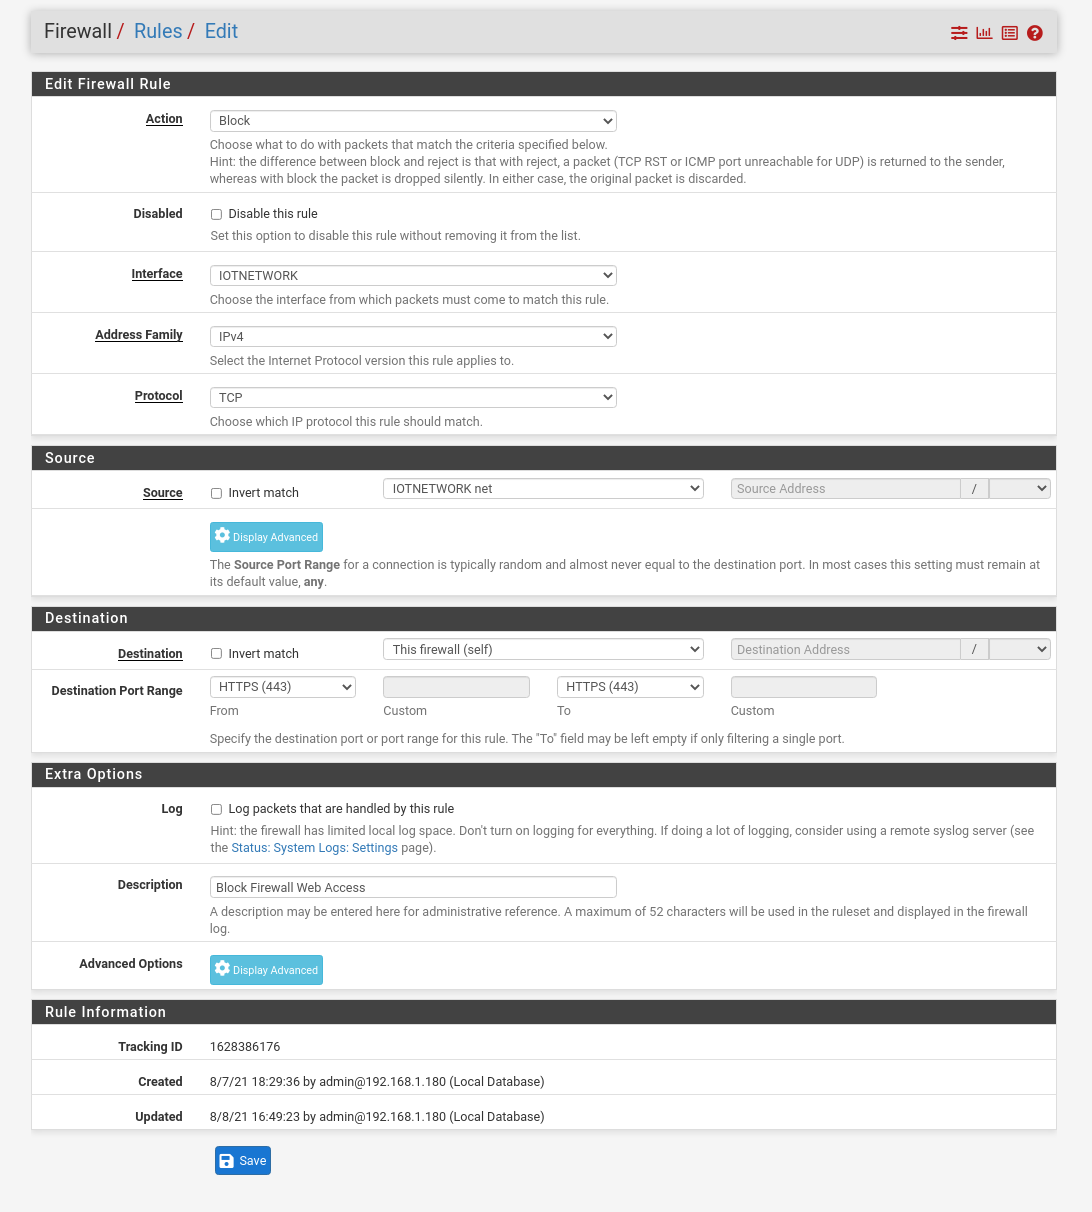
The first firewall rule will block access to the router webconfiguration. In this firewall rule we are saying to block all tcp connections originating from the IOTNETWORK to the Firewall(self) at the management port 443.
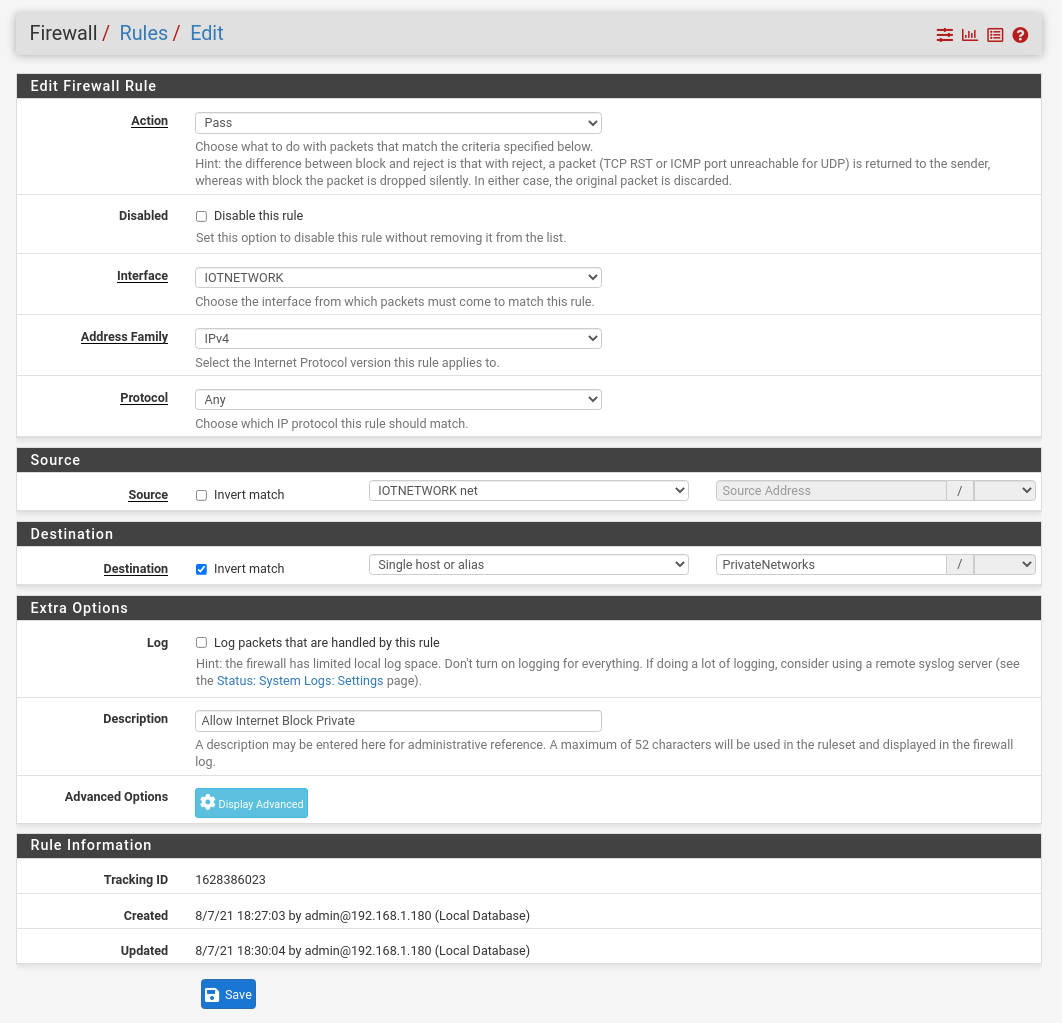
- The second firewall rule will allow internet access but not access to the private networks from IOTNETWORK.
-
-
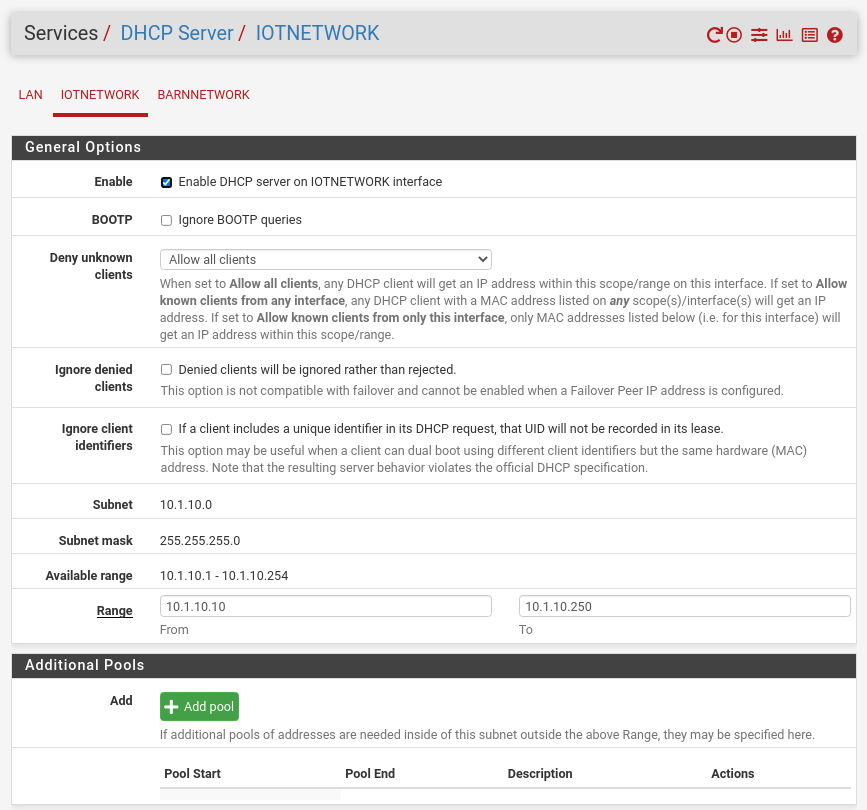
Setup DHCP Server
- Navigate to Service -> DHCP Server select the vlan network. Enable it, and pick the dhcp range, keep in mind we will need to give static ips to the LIFX bulbs on the network.
-
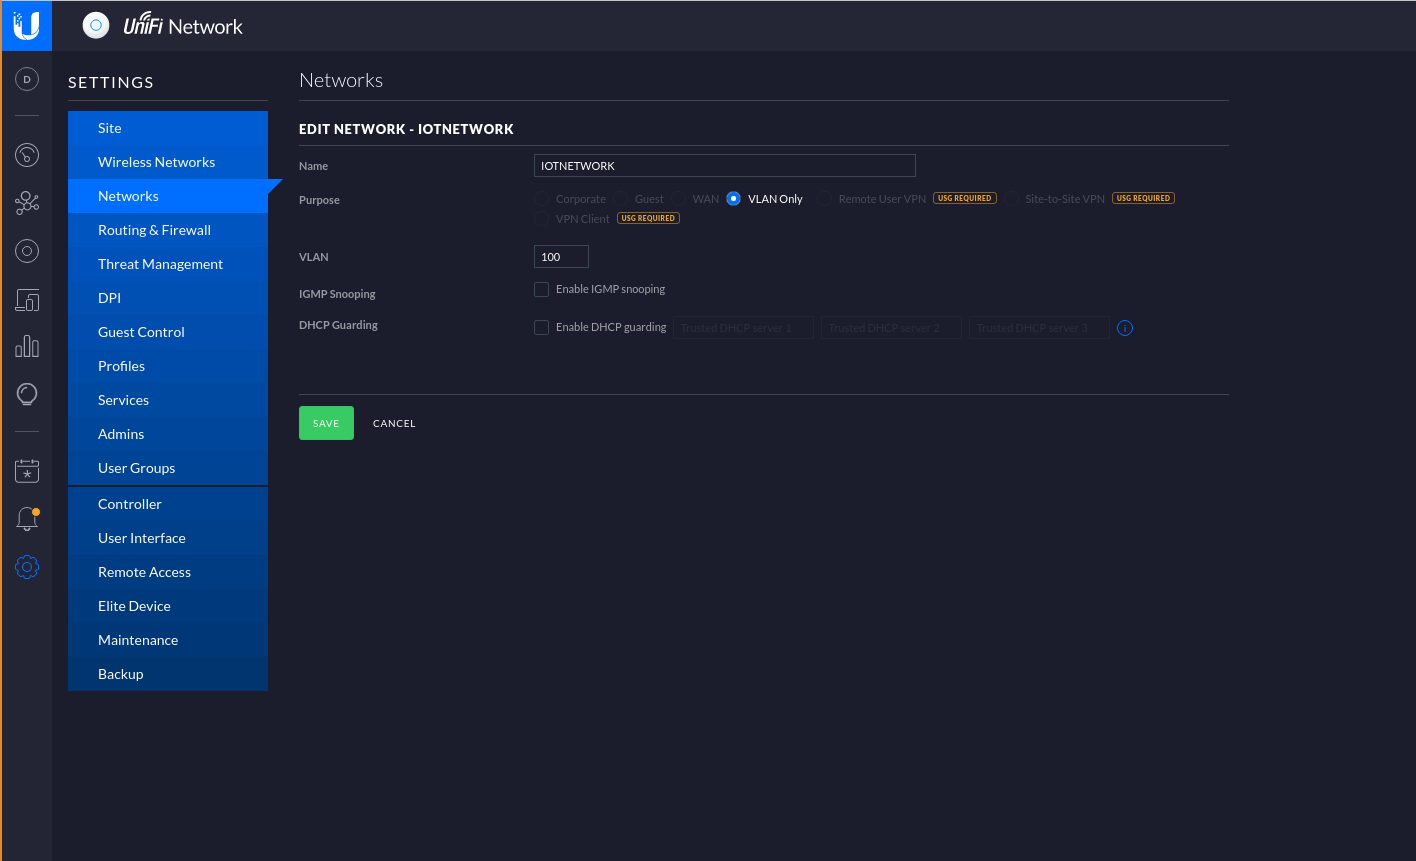
Creating IOT Wifi on Unifi Controller. Switch over to Unifi controller.
- Add VLAN to networks. Go to Settings->Networks Click Create New Network, name the network, select VLAN Only, and input your vlan number that was setup on pfsense back on step 1.
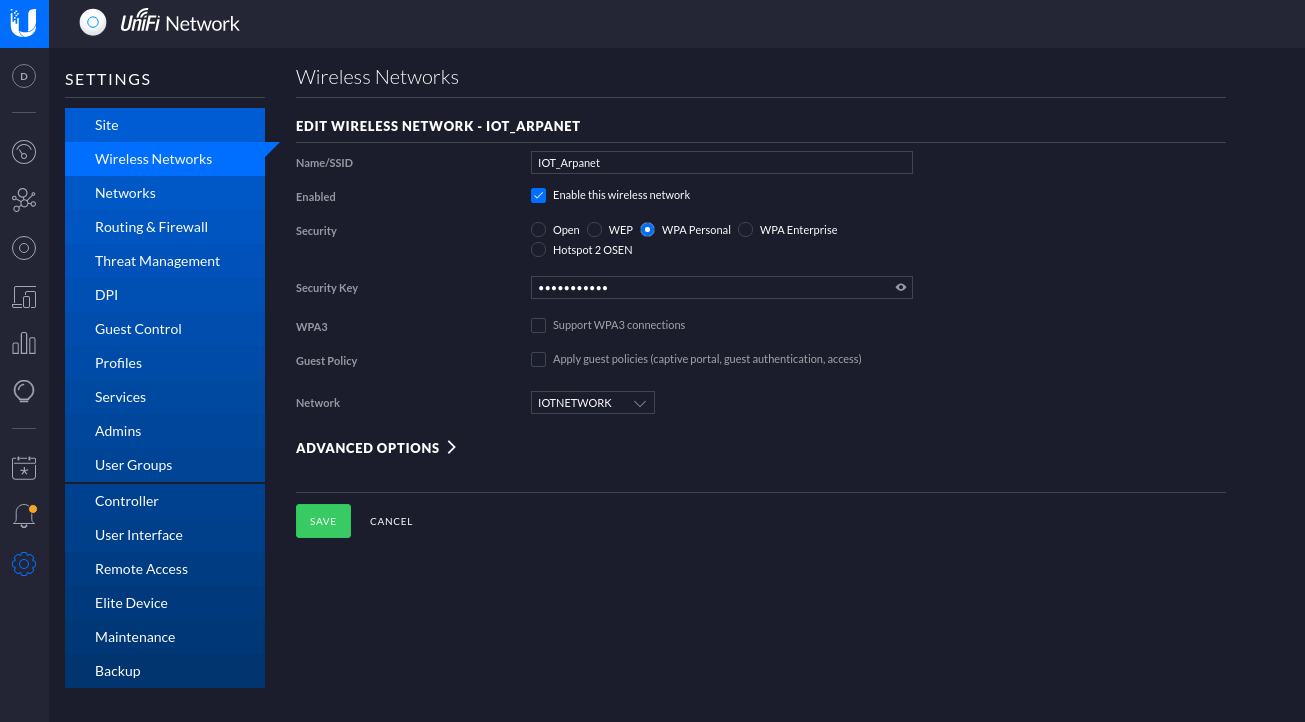
- Setup new wifi for VLAN devices. On Unifi controller navigate to Settings-> Wireless Networks. Select “Create New Wireless Network”. Add your ssid, select WPA Personal, add a password, select to enable network and select your VLAN Network.
At this point we have an IOT wireless network that has it’s own VLAN which can’t talk to our private networks but can talk to the internet, additionally the trusted networks can talk to the VLAN. The next changes will be specific to allowing Lifx to work.
Setting Up LIFX Bulbs (And LIFX Specific Networking)
Setting Up Avahi on pfSense
To allow LIFX discovery on the network we need to allow multicast to work across network. The easiest way to do this is to install the Avahi package on pfSense.
- Install Avahi Package.
- Back on pfSense go to System -> Package Manager click Available Packages search and install Avahi package.
-
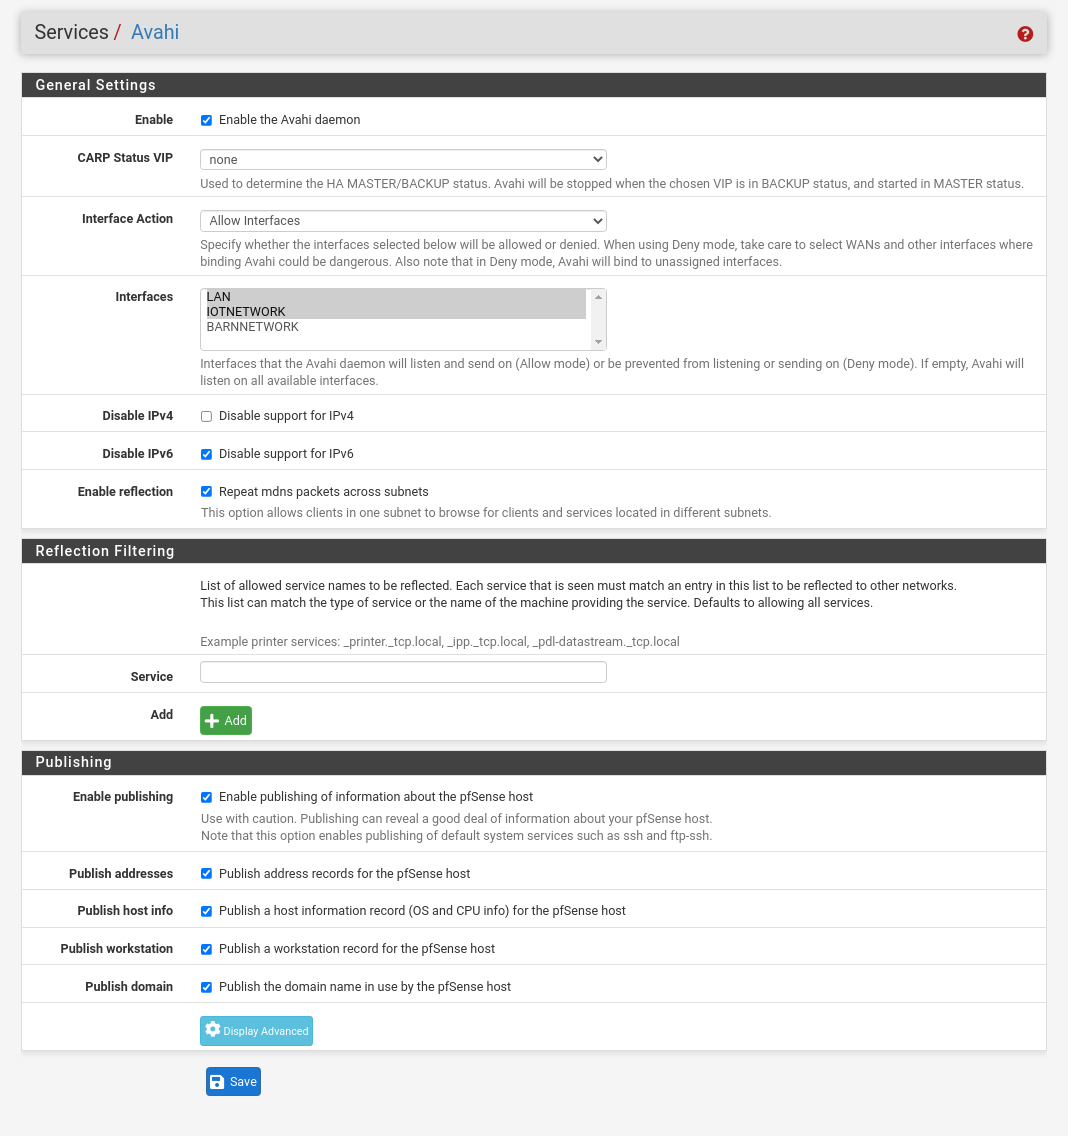
Once installed go to Services -> Avahi, select which Interfaces should share multicast (for me this is LAN and IOTNETWORK) and the following:
- Enable daemon
- Disable IPv6
- Enable reflection
- Enable publishing
- Publish addresses
- Publish host info
- Publish workstation
- Publish domain
Setting Up Lifx Port Forwarding (Lifx Firewall Specific Changes)
The last change that needs to be made to the firewall is to the network is opening port 56700 for the LIFX bulb to establish a connection with the home assistant controller
-
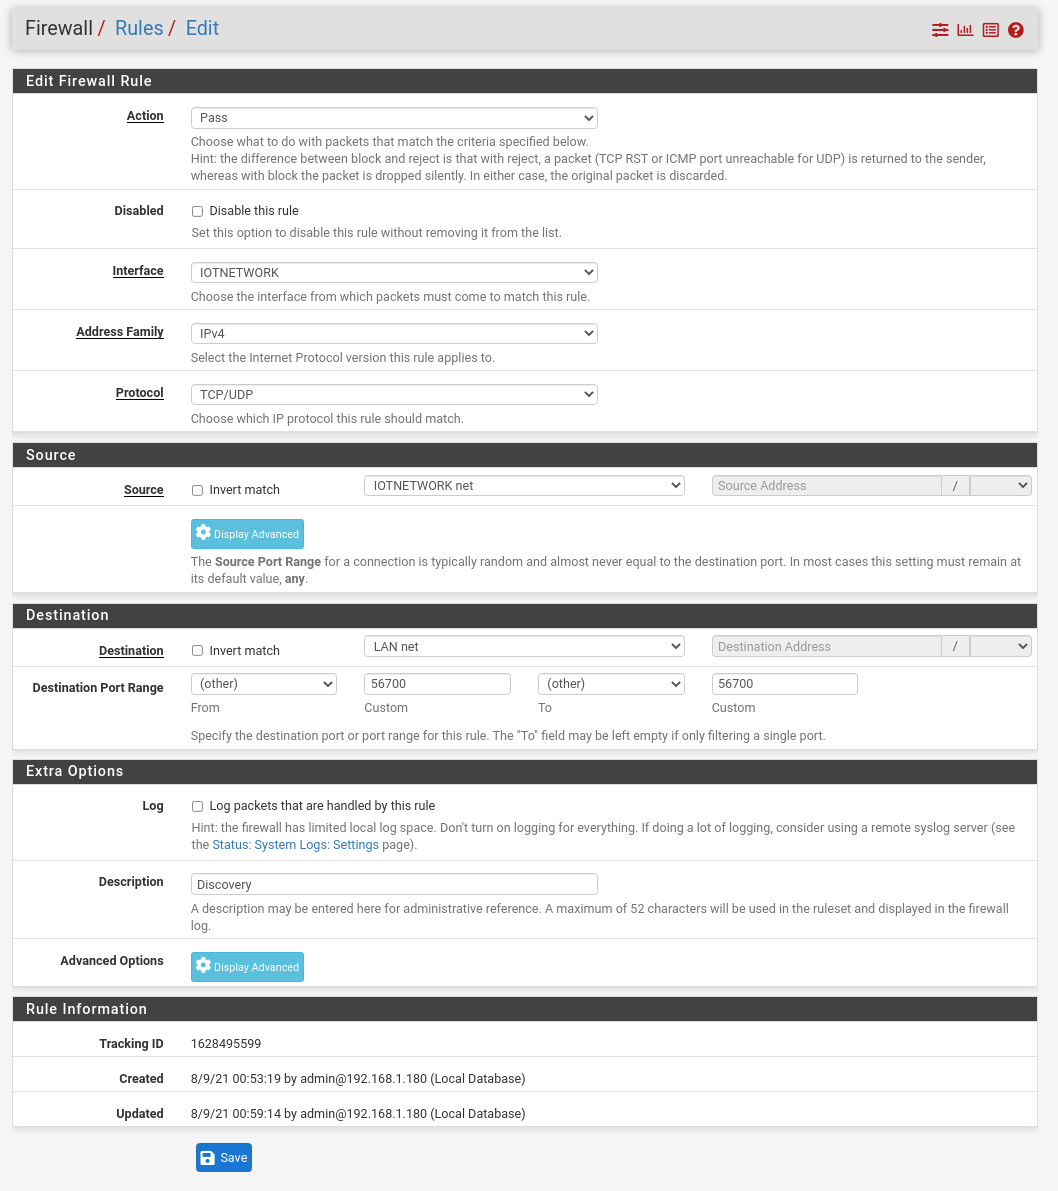
Navigate back to the vlan firewall on pfSense Firewall -> Rules and select your vlan network.
-
Add a new rule allowing tcp/udp connections from the vlan network to the lan network on port 56700.
Setup LIFX Lightbulb
- Using the LIFX app setup the lightbulb on the new network (more information can be found here). During the setup you will name the device which will be used in the following steps, mine is named “Desk Background”.
Adding Lifx Integration with Home Assistant
- We will now be switching over to the home assistant web config (default address is http://homeassistant.local:8123/).
Lifx Install
- Install LIFX Integration in Home Assistant web UI, Configuration -> Integrations click Add Integration. Search for LIFX and follow the prompts to install.
Bulb Set Up
-
Next going back to the pfSense config we will setup a static ip address for the Bulb.
-
Navigate to the dhcp leases in pfSense, Status -> DHCP Leases, locate the new lifx bulb and click the small plus next to it that says “Add Static Mapping”.
-
Give it a ip address, client name and description and save. I haven’t found a good way to have the lightbulb pull a new ip address but you can wait for the new ip address to be assigned.
-
-
Switching back to the Home Assistant web interface we need to install the Terminal App.
-
Enable Advanced Mode by navigating to User(in my case Ben in the lower left hand corner) and toggle on Advanced Mode
-
Next to install go to Supervisor-> Add-on Store in the left main menu and search “Terminal & SSH” install and set the configuration to “start on boot” and “Show in sidebar”. You may need to manually start this process the first time.
-
Click on the terminal button now in the sidebar and using vim in the terminal open “configuration.yaml”. We will be adding the information about our led bulb ip address here. At the bottom of the config add the following where “server” is the ip address of the Home Assistant server and broadcast is the static ip address set to the bulb.
lifx:
   light:
      - server: 102.168.1.12
      - port: 56700
      - broadcast: 10.1.10.2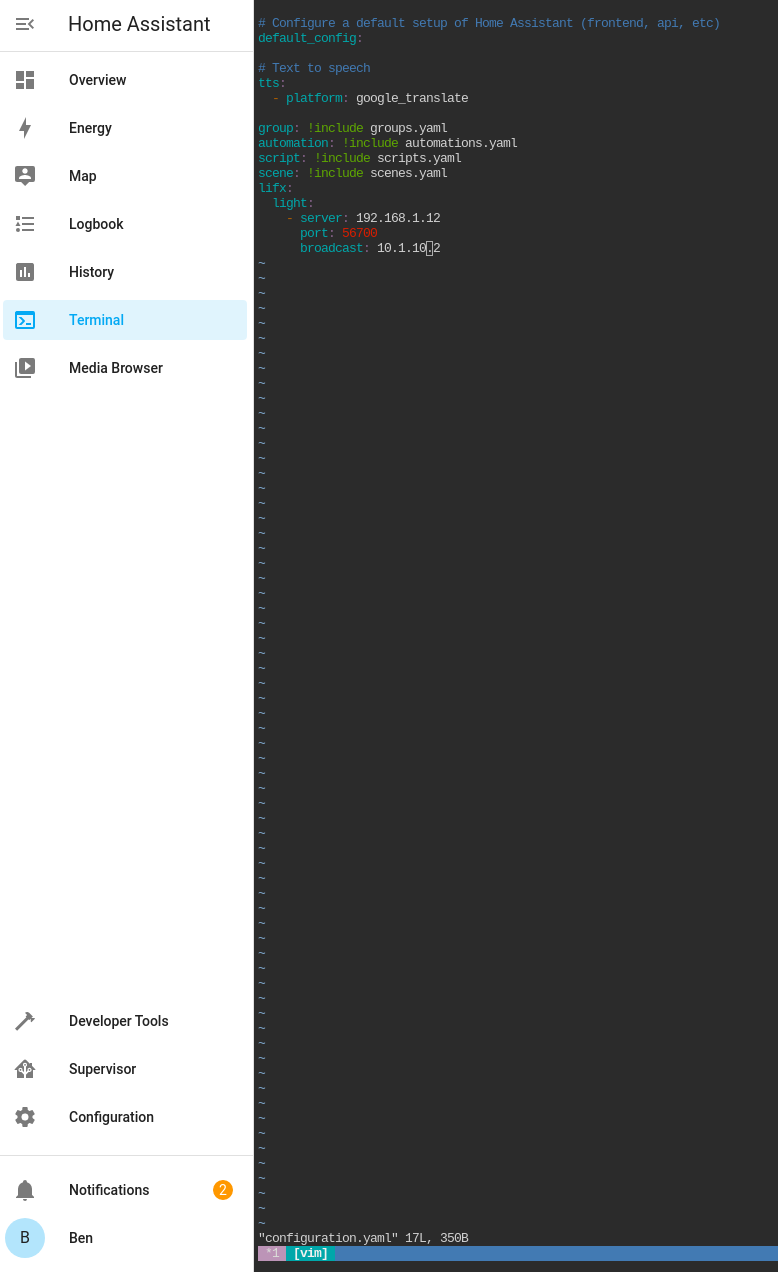
-
You can check that discovery and integration is working by looking at Configuration -> Integrations and checking that a device is seen in the LIFX integration.
Creating Dashboard Button
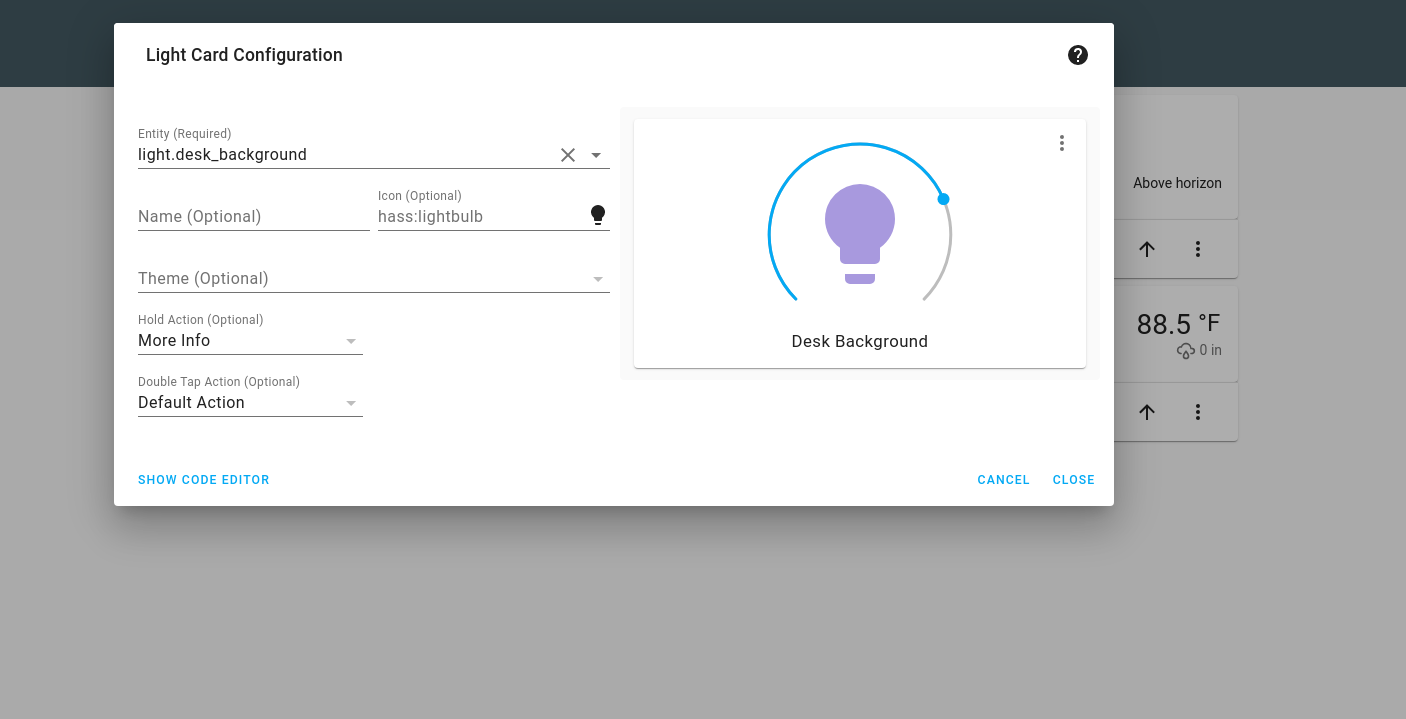
With everything setup we can now setup a card on the home screen to provide control of the lifx device.
- On the Home Assistant “Overview” page click the upper right triple dots and select edit dashboard.
- Select add card and select “Light”
- Select the entity that corresponds to your lifx bulb and click save.
Summary
Once the lifx bulb is working in home assistant any home automation can be done using the device. To add another device just set it up on the same special vlan, set a static ip and add it to the home assistant yaml file.
Disclaimer
I wrote this after getting things working, it is possible I missed a small step or setting the static ip address for the lights is not necessary. I will eventually I will run through the guide again and test everything. Feel free to email me if you run into any issues.